
I first encountered Tarte Tatin when I went to London in 1987 to work at Le Merdien Hotel on Piccadilly. In Germany apples are plentiful and grown all over, and I’d tried all sorts of apple cakes and tarts, but never that wonderful confection, which was “accidentally” invented by the Tatin sisters in the 19th century (see Wikipedia link at the end of this post). I soon found out that whilst very delicious, Tarte Tatin is not one of the easiest dishes to prepare. For starters you really need a very heavy tin, preferably copper or cast iron, which distributes the heat well, and which can go into the oven.

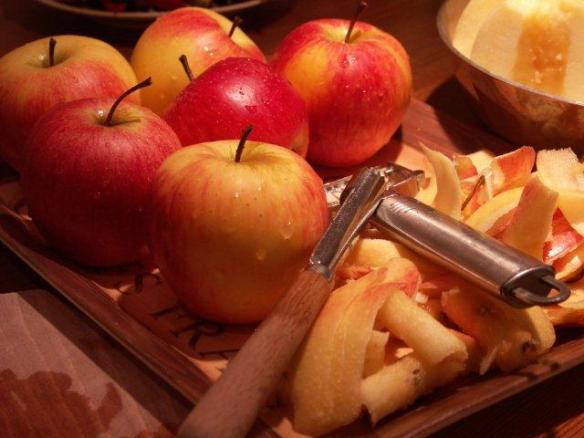
The ingredients are simple: apples, butter, sugar and shortcrust pastry. About an ounce and a half of butter goes into the tin. You decide if you want to use softened butter and smear it evenly over the inside of the tin, or if you want to let it melt gently. Next comes the sugar: six tablespoons of it and regular granulated will do fine; sprinkle it in an even layer. Finally, the apples: a question of choice and personal preference. You want to use apples which don’t turn into mush on cooking, so Bramleys are out. They should also not be too sweet nor too juicy. Here in France I like to use Chantecler apples, which have a wonderful flavour when cooked. At the Meridien hotel in London we used Golden Delicious apples, and I have used Reine de Renette and Corail (pictured ) with success. For my 9.5″ tin I used 11 medium-sized apples.


Peel and core your apples then cut in half. Stand the cut halves in the tin, cut side against the uncut side, fitting them in tightly. Keep two or three extra halves, which you place on top – you’ll see why later.

Once your mould is prepared and filled you put it on medium low heat and start the cooking process. To start with, you want to just see the apple juice beginning to run – take your time, your patience will be rewarded. Altogether the cooking time on the top of the stove took an hour and 20 minutes, but this will depend on how juicy your apples are.

The cooking process is slow and as the apples soften you’ll be able to fit the extra pieces in here and there, use a table knife to help you slip them in. That way the finished tart will not have any gaps and be nice and high. Turn your oven on to 180 degrees. You might have to turn the mould from time to time, to make sure that it is cooking evenly. Keep an eye on it all the time. Eventually the water will evaporate and the sugar will start to caramelise. Don’t be tempted to speed up the cooking process by using higher heat, you want your apples to cook and absorb the sugar and butter mixture, and that will take time.

Once the sugar starts to caramelize you have to watch like a hawk and make sure the heat is not too high. I’ve burnt my fair share of Tarte Tatins at that stage and had to start all over again. When it starts to go from a light butterscotch colour to a somewhat darker caramel you’re almost there. Give it a few more minutes and make sure the colour of the caramel is even across the tin, you might have to move it around on the hob a little to make sure it’s done throughout. When the colour is almost that of a chestnut remove the tin from the heat; you don’t want the caramel to be too dark as it will cook some more in the next step. Now pop the tin in the oven.


The idea now is to cook the tops of the apples which did not get cooked with the caramel. The length of cooking depends on the type of apple you are using, a general guide is about 30 minutes, but test to check if the top of the apples are soft after 20 minutes. Once done take out and leave to cool – you can leave it overnight in which case you can cover the tin with some foil and refrigerate it.

Make some shortcrust pastry with 175 flour, 100 butter and 3 tbsp water. If you like you can add a tablespoon or two of sugar, but I find that’s not necessary. Chill the pastry for at least half an hour or overnight. Pre-heat the oven to 200 degrees. Roll the pastry and cut a circle 1.5 – 2cm larger than the top of your tin.

Brush off any excess flour and then place the pastry disk over the apples in the tin. The excess should be slipped down inside the tin, I use the back of a flat pastry brush to help with this.

Once the pastry is all neatly tucked in bake for 25 minutes, or until the top of the pastry is golden. Remove the tin from the oven and leave to cool for at least 10 minutes. Invert a large plate over the tin and very carefully turn the tin and plate over in one swift movement – be very careful as there may be hot sugar syrup inside which could leak and burn you. If everything has gone to plan the tart will slip out beautifully onto the plate, although you might have to give it a helping hand with a sharp downward movement, holding the tin on top of the plate. Lift the tin off et voila. Don’t worry if one piece has stuck to the inside of the tin. Carefully take it out with the help of a palette knife or a table knife, place it in the gap in the tart and lightly smooth over with the side of the knife, nobody will know. Serve your Tarte Tatin slightly warm, either with crème anglaise, crème fraiche or good vanilla ice cream, but of course it can also be eaten on its own. Bonne degustation!

The above tart was cut into six generous pieces and gobbled up in record time! You could also serve eight with it. For more information about the history and/or legend of Tarte Tatin, have a look at the Wikipedia entry at http://en.wikipedia.org/wiki/Tarte_tatin . Be warned – once you’ve tasted a piece of my version of Tarte Tatin you may find fault with many desserts routinely served under that name. And of course there are the variations made with all sorts of other fruit and even vegetables and different types of pastry, but they are all just “in the style of” and are really upside down cakes or tartes!!

Never ever made this! (very ashamed to say). I must admit I am a bit of a salt fiend, but your photos give me ‘courage’ to try it. It looks delicious!
LikeLike
Do give it a try if you have the time – it’s well worth it! Instead of the special pan you could use a heavy frying pan with almost straight sides, so long as the handle can go into the oven. Mind, non-stick usually does not work too well with caramel.
LikeLike
We made this lovely dessert in a cooking class in Morocco last year. It was delicious!
LikeLike
Hi Eva, Thanks for your visit! Great you’ve tried your hand at it already!!
LikeLike
Oh, I have always wanted to make this!! wish I could stop by for a coffee and a slice!
LikeLike
Any time, Patrise! just give me a day’s warning!!
LikeLike
about the tin, I’ve seen versions of this which use a cast iron skillet.
LikeLike
Absolutely – so long as it’s heavy and can go in the oven it’ll work.
LikeLike
Pingback: On the road for antiques | midihideaways
Pingback: Seven years on … | midihideaways