Apricot Bonanza

With the apricot season starting, I thought I would remind you of a few ways these wonderful fruits can be enjoyed. I originally wrote this article back in 2015, and I still make the dishes I wrote about then. There are no apricots on my friends’ trees this year (the frost nipped at it during blossom time), but luckily there are plenty of apricots to be found in the twice weekly market in Saint-Chinian!


This year I was lucky enough to have the pick of the crop from a tree belonging to friends – they were away while their tree was full of ripe fruit!!
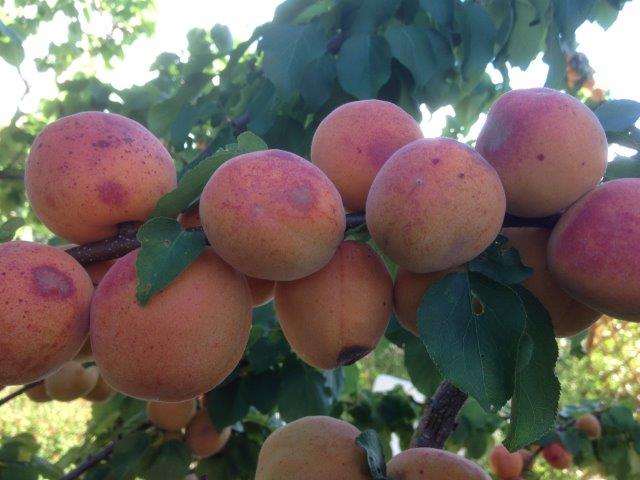
When I started to think about what to do with this bounty, the first thing which came to mind was apricot jam –  beautifully orange coloured, and full of the flavours of the sun!!

Whenever I make jam these days, I try to use the kind of jam sugar where you can use 500g of sugar for 1kg of fruit, which makes for a much fruitier jam.

For this apricot jam I cut the apricots in half to remove the stones, and then cut each half again into four pieces.

PICT8590

Once all the apricots were cut, I mixed them with the sugar, and put them in the refrigerator to stand overnight.

PICT8599

Whilst the apricots are standing, the sugar draws out the juice, and the fruit tends to hold its shape better during cooking, rather than simply turning into mush.  This time I also cracked some of the apricot stones open, and added the ‘almonds’ to the mixture, hoping they would impart some of their lovely almond flavour to the jam.  Apricot ‘almonds’ do concern small amounts of cyanide, so if you are at all concerned about this, please leave them out.

PICT8597

The following morning the mixture looked like this:

PICT8602

The sugar had done its work, drawing out lots of juice from the apricots.  Boiling time is only four minutes, so that the vitamins won’t get boiled to death altogether!  The sugar which I use contains the right amount of pectin, so that the jam will always set.  In France it is available under the name of Fruttina Extra, and you’ll be able to find the international websites for the company here.

Et voila!!  Apricot jam always seems to froth quite a lot, so use a large pan and keep stirring!  I potted my jam the moment the boiling time was over, in twist-off jars.  It keeps well, except for when it gets eaten!! 🙂

I still had a fair amount of apricots left, so I started to wonder what else I could prepare with them.

PICT8610

Some time ago a friend told me about grilled peaches, so I thought I would try that with the apricots.  For this recipe I chose the firmest apricots I had, as they could otherwise turn to mush very quickly.  I pressed my trusted cast-iron griddle pan into action, and grilled the apricots on the pre-heated griddle, cut side down, for about 5 minutes.

PICT8617

I topped each apricot with some fresh goat’s cheese, and sprinkled them with freshly ground black pepper and fresh thyme leaves.

PICT8619

A final drizzle of olive oil, and I had a plate full of the most delicious appetizers.

PICT8623

They were every bit as good as they look, and really quick and easy to prepare!!

Another recipe I came across during my search was Mary Berry’s apricot frangipane tart.  I followed the recipe pretty much to the letter, except for using fresh apricots where the recipe indicated tinned.  And I’ll admit it right now:  I used ready rolled pastry – time was short, as was the pastry!!  I also ground my own almonds, which accounts for the darker colour of the frangipane.

PICT8625

The recipe is very straightforward and quick to make, especially if you use ready rolled pastry.

I was getting a little worried when I started to spread the frangipane mixture over the apricots – there seemed to be far too little!

PICT8636

But I needn’t have worried – Mary Berry is not called the ‘Queen of Baking’ for nothing!!  After 40 minutes in the oven the tart was looking beautiful, and after a couple of hours of cooling off it tasted divine!! 🙂

PICT8637

There are many more delicious recipes out there, which use apricots – what is your favourite??

Fields of red

It’s the time of year again when I can spot patches of brilliant red as I drive through the countryside! Somehow, it feels as though the poppy season is a little later than usual this year, but perhaps that’s my imagination…

A few years ago, there was the most brilliant display of poppies just outside the hamlet of Cabezac. Something had been grubbed up in a field and the following spring saw an explosion of poppies!

Papaver rhoeas is the latin name of the common poppy, also called field poppy, Flanders poppy or red poppy.  It grows particularly well in recently disturbed soil, and hence it’s association with the churned up WWI battlefields of northern France.  In Cabezac, the field had been ploughed, perhaps late the previous year or earlier that year, in preparation for a cereal crop or some such.  If any seeds had been sown then, they had had no chance against the poppies – I saw no evidence of a struggling crop.

The field was so spectacularly red that many people stopped their cars by the side of the road and hopped out to take a picture or two.  The snails on the post didn’t seem to be particularly fussed about the poppies or the passers-by.

I walked around the edge of the field, careful not to step on any poppies!  I found this beautiful thistle which looks wonderful against the red background, don’t you agree?

There were also some marguerites:

Some of the visitors walked right into the middle of the field, perhaps thinking of Claude Monet’s Coquelicots (Poppy Field) form 1873, which shows a lady with a parasol and a child walking through a field.  It’s a painting which has been reproduced countless times – I’m sure you’ve seen it somewhere!  The original hangs in the Musee d’Orsay in Paris.

Nobody carried a parasol the day I took the pictures, but there were many mobile phones in evidence!! 🙂

I’ve teased you long enough with my descriptions – here, finally, is the field in all its glory:

Something to think about: a single poppy plant can produce up to 400 flowers during its life cycle!  If only some of the poppy flowers in the field produce seeds, there is a good chance that there will be another amazing display before too long.

And another thing to remember: poppy seeds can stay dormant for a very long time, until the soil is disturbed once more…

Exuberant, generous, enthusiastic…

Those things come to mind whenever I see a wisteria flowering! Right now, the wisteria in my garden is in full bloom and abuzz with a variety of bees, and the scent is delightful! There’s still a lot of work to be done in my garden – this year I’m very much behind with preparing and planting, but there’s always time for a cup of tea whilst sitting under the wisteria and watching the bees going about their business!

Happy Easter!

Today is Good Friday, and it’s high time I posted again – it’s been a long time! I wrote the article below back in 2016, and I’ll be following the same time-honoured rituals today, dyeing eggs and baking lamb-shaped cakes! Some things never change, whilst others change beyond recognition! I hope you all have a good Easter weekend, wherever you may be!


For as long as I can remember, I have associated Easter with brightly coloured eggs. When we were children, my brothers and I would decorate blown hens’ eggs in the weeks before Easter.  For several weeks before Easter,  instead of cracking eggs open to use them in cooking or baking, a hole would be pierced in either end of the egg (a larger hole in the ‘flatter’ end), and the egg white and yolk would be blown out through the holes.  The resulting blown eggs would be washed and dried before being decorated.  The eggs might be painted, pasted with cut-outs, drizzled with coloured wax – anything and everything was allowed and encouraged as far as decorating techniques went.  The finished eggs would be hung with a piece of thread on the cut branches of forsythia or other flowering shrubs, and they would decorate the house during the Easter festival.

In the run-up to Easter, the shops would start selling brightly coloured hard-boiled eggs – you would be able to find them right next to the fresh eggs, in virtually every store!  They were always looking so perfect and shiny – as though they had been laquered.  Maybe they had been???  Those store-bought eggs didn’t make it into our house very often.  Instead, my brothers and I would help mum dye hard boiled hens’ eggs on Good Friday.  It’s a tradition I still keep alive, all these many years later!

There are a number of ways to dye the eggs using various natural vegetable dyes such as beetroot and spinach juice, or dried onion skins.  An easier and foolproof way, is to use  ready-made egg dyes.  One of my sisters-in-law sent me a packet this year – thank you Veronika!!

It’s best to dye the eggs just after they have been boiled and while they are still warm.  I put all my eggs into one pan (no, not into one basket!! 🙂 ) and covered them with cold water.  When they started to boil I set the timer for six minutes.

IMG_4370

While the eggs were cooking, I prepared the dyes.

IMG_4372

The packet contained five colour papers:  red, orange, green, blue and yellow – a rainbow of colours!  đź™‚  Since yellow does not really change the colour of brown eggs, I added that in with the orange.  Into each cup were put two tablespoons of white vinegar, 250ml of boiling water, and one dye-paper.

IMG_4375

Once the eggs had finished cooking, I briefly ran them under the cold tap, before they went into the dye bath, one at a time for each colour.

IMG_4376

They emerged totally transformed!!

IMG_4380

Bit by bit my egg box was filling up with wonderfully coloured eggs!  Below are the last four:

IMG_4385

This is a picture of the dye I used for this batch of eggs.  You should be able to find something like that on one of the internet mail-order sites or in your grocery store?

IMG_4392

To make them shine, the eggs can be rubbed with a little bit of olive oil.

2015-04-03 14.06.09

Baking a cake in the shape of a lamb is another Easter tradition in my family.  Some years ago, I was lucky enough to inherit my grandmother’s baking tin.  Nowadays, if I am home for Easter, I will bake at least one cake in that mould.  For the cake recipe, I looked at Gaston Lenotre’s Desserts and Pastries.  It’s a wonderful book, full of very precise and easy to follow recipes.  I used his Genoise recipe, a very light sponge cake.

IMG_4342

The ingredients are very simple:  eggs, sugar, flour, butter and vanilla flavoured sugar!

IMG_4334

Three eggs are mixed with 78g of sugar and the vanilla flavoured sugar in a heat proof bowl – I used the bowl of my stand mixer for this.  The bowl is then set over boiling water, and the eggs are whisked for one minute – no more!  I then put the bowl on the mixer, and whisked the egg/sugar mixture on high speed for two minutes, and on medium low speed for another five minutes or a little longer, until it was cool and very white and thick.

IMG_4338
IMG_4340

While all the whisking was going on, I brushed both halves of the mould very carefully with melted butter, and gave them a light dusting of flour, to prevent the finished cake from sticking to the mould.  I also melted 23g of butter for the cake mix.

When the egg mixture was ready, I sifted 78g of flour over it and folded it in gently.  Then I added the melted and cooled butter, and folded that in too.  The finished mix was poured into the mould, and the cake was baked in a pre-heated oven at 180 degrees for 30 minutes.  For the first cake I had set the oven to the wrong function (regular convection rather than fan-assisted), so the cake did not turn out from the mould as easily as it should have.

IMG_4345

I baked another one right away, using the fan-assist setting, and it turned out near perfect!

IMG_4346

And here they are – decorated with a dusting of icing sugar and some tiny bells hung with red ribbon around their necks, and surrounded by some dyed eggs!

IMG_4407

Do you have a special Easter tradition?  Would you would like to share it with me?

Open again!

On October 30, 2020, restaurants, bars and cafes all over France had to close their doors to the public as part of another lockdown. At the time, nobody had any idea as to how long they would have to remain closed, but I don’t think that anyone expected the closure to last as long as it did! Finally, on May 19, 2021 – after six and a half months!! – restaurants, bars and cafes were allowed to serve customers once more. To begin with, diners are only allowed to be seated outside, with tables widely spaced, and the 9pm curfew still in place – but it’s a start!

When you think about how important a role food plays in French life and culture, you can imagine what a deprivation it has been not being able to go out for a meal. Even a glass of wine or a coffee on one of the terraces of the cafes was out of bounds!

I visited Cafe de la Paix in Saint-Chinian last Saturday evening to catch up with friends, and to enjoy a meal prepared by someone else!

The bar at Cafe de la Paix

Cafe de la Paix was taken over by David and Eve four years ago, and they’ve been working hard to improve the guest experience. The garden has had a complete makeover, the gravel being replaced with paving. There is new (comfortable) terrace furniture, and the place has had a general sprucing up inside and outside!!

The garden at Cafe de la Paix

The menu has also had a makeover – the focus is now on bistro cooking and appetising presentation!

Here now are photos of the dishes we enjoyed! 🙂 First off, a couple of delicious starters

Pissaladiere onion tart with smoked trout
Vegetable tart with shavings of Spanish ham

The main courses were equally delicious, and it was bliss to just sit there and have someone bring the food to the table!!

Filet of seabream on a bed of pasta with mussels
Rump steak with red wine sauce and potato gratin
Duck with olives

Our desserts arrived as it was slowly getting darker. The weather was perfect and I didn’t need to put on the jacket I had brought in case I got too cold! The desserts were a yummy ending to a lovely meal!!

Chocolate mousse, chocolate granola, and buckwheat ice cream
Strawberry eclair with strawberry sorbet
Cherry creme brulée

Because of the 9pm curfew, the restaurant had opened at 6.30pm to give diners ample time to enjoy a leisurely meal – it worked very well for us! If you have been to France in the past, you may remember that most restaurants don’t start to serve dinner before 7.30pm. I imagine that we’ll go back to this later starting time once the curfew gets abolished altogether later this summer.

As we head into summer, things are looking a lot more upbeat and I’m keeping my fingers crossed that it’ll continue that way.

Have you visited your favourite restaurant in France yet?

Asparagus time!

Each spring, I await the coming of the asparagus seller to the weekly market with eager anticipation! Asparagus can be had in the supermarkets well before it arrives at the weekly farmers market, but the supermarket offerings have often travelled a fair distance and are not as fresh as they should be. Most vegetables lose some of their quality if stored too long after harvesting, and asparagus is no exception! The sooner it is eaten after being harvested, the better!! I like to eat the first asparagus of the season simply boiled and served with melted butter and some steamed new potatoes. Once I’ve had my fill of it that way, I will prepare it in different ways.

A few weeks ago, a dear friend suggested that I try Jane Grigson’s recipe for Asparagus and Chicken Gratin. The recipe can be found in Jane Grigson’s Vegetable Book, a wonderful collection of delicious recipes for pretty much every kind of vegetable, and one which I just happen to have on my bookshelf! 🙂 . To sum up the recipe, cooked asparagus is layered with cooked chicken, a white sauce is poured over and the whole is topped with grated cheese, breadcrumbs and some melted butter before being baked until golden and bubbly. Sounds simple – and it’s incredibly delicious!!

The ingredients call for 500 g of asparagus and half a large roasted chicken. Since I don’t prepare roasted chicken very often, I bought three chicken leg quarters from the new poultry stand in the market (that’s a story for another article – I promise!) and roasted them.

I cut a thin slice from the end of each stem and peeled the lower parts of the asparagus in order to minimise waste. I cut the prepared asparagus stems into approximately 5 cm pieces before cooking them in boiling salted water.

I drained the asparagus pieces when they were just tender but retained a bit of bite, and refreshed them in cold water. I set the cooking liquid aside as that was to be used for the white sauce. Here are the main ingredients ready to be layered:

For the white sauce I used 1.5 tbsp of butter and 1.5 tbsp of flour, 300 ml of asparagus cooking water, and 150 ml of cream. For extra flavour, I also added the residue left behind in the tin from roasting the chicken!! I seasoned the sauce with salt and pepper and cooked it until it was nice and thick.

While the sauce was cooking, I put a layer of asparagus into my gratin dish from Poterie Not, and topped that with the diced chicken, which I topped with the remaining asparagus. I decided to use the tips for the top layer and to arrange them in a pretty pattern, but you can do it any way you like. I did not want to overfill my gratin dish, so I filled a smaller dish as well.

I poured the white sauce evenly over the filled gratin dishes and sprinkled the tops with breadcrumbs and grated comte cheese. Grigson specified cheddar cheese in her recipe, but alas, it’s not easy to find cheddar in our part of France.

Once the melted butter was drizzled over the gratin, it was ready to go into the oven. The recipe called for a moderate to high temperature – I set the oven to 190 degrees Centigrade and baked it for about half an hour. While the gratin was in the oven, I prepared some tender broad beans which I had picked in my garden that morning. The pods were very young with the beans hardly developed, so I steamed them whole.

Here’s the finished gratin – it was divinely delicious and well worth the effort that went into its preparation!! Do give it a try if you get a chance!

What’s your favourite way of eating asparagus?